


Running RStudio and Setting Up Your Working Directory - Easy R Programming
After installing R and RStudio, the question is now how to start using R/RStudio. In this article, we’ll describe how to run RStudio and to set up your working directory.
Note that, it’s possible to use R outside or inside RStudio. However, we highly recommend to use R inside RStudio. RStudio allows users to run R in a more user-friendly environment.
Use R outside RStudio
Under Windows and MAC OSX
For the first time you use R, the suggested procedure, under Windows and MAC OSX, is as follow:
Create a sub-directory, say R, in your “Documents” folder. This sub-folder, also known as working directory, will be used by R to read and save files.
Launch R by double-clicking on the icon.
- Specify your working directory to R:
- On Windows: File –> Change directory
- On MAC OSX: Tools –> Change the working directory
Under Linux
Open the shell prompt
Create a working directory, named “R”, using “mkdir” command:
- Start the R program with the command “R”:
$ R
- To quit R program, use this:
$ q()
Use R inside RStudio
Using R inside RStudio is the recommended choice.
Launch RStudio under Windows, MAC OSX and Linux
After installing R and RStudio, launch RStudio from your computer “application folders”.
RStudio screen

RStudio is a four pane work-space for 1) creating file containing R script, 2) typing R commands, 3) viewing command histories, 4) viewing plots and more.
Top-left panel: Code editor allowing you to create and open a file containing R script. The R script is where you keep a record of your work. R script can be created as follow: File –> New –> R Script.
Bottom-left panel: R console for typing R commands
- Top-right panel:
- Workspace tab: shows the list of R objects you created during your R session
- History tab: shows the history of all previous commands
- Bottom-right panel:
- Files tab: show files in your working directory
- Plots tab: show the history of plots you created. From this tab, you can export a plot to a PDF or an image files
- Packages tab: show external R packages available on your system. If checked, the package is loaded in R.
For more about RStudio read the online RStudio documentation.
Set your working directory
Recall that, the working directory is a folder where R reads and saves files.
Change your working directory
You can change your working directory as follow:
Create a sub-directory named “R” in your “Documents” folder
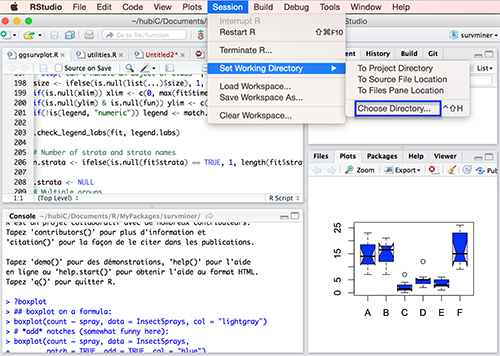
- From RStudio, use the menu to change your working directory under Session > Set Working Directory > Choose Directory.
- Choose the directory you’ve just created in step 1
It’s also possible to use the R function setwd(), which stands for “set working directory”.
setwd("/path/to/my/directory")For Windows, the command might look like :
setwd("c:/Documents/my/working/directory")Note that, if you want to know your current (or default) R working directory, type the command getwd(), which stands for “get working directory”.
Set a default working directory
A default working directory is a folder where RStudio goes, every time you open it. You can change the default working directory from RStudio menu under: Tools –> Global options –> click on “Browse” to select the default working directory you want.
Close your R/RStudio session
Each time you close R/RStudio, you will be asked whether you want to save the data from your R session. If you decide to save, the data will be available in future R sessions.
Infos
This analysis has been performed using R software (ver. 3.2.3).